Showing posts with label tutorial. Show all posts

Wednesday, July 1, 2015

Baby Showers

Hi all! 

I actually did not plan this mani but it ended up painting a baby shower-ish mani. I was going for a neat, basic, elegant and pastel mani in the beginning. 


So, I grabbed some @teismom stripe nail vinyls and my Laval pink polish. It looked pretty good then as I was going for my right hand, I decided to use a different colour. Who wants to be same as the others? =P


I haven't gotten the chance to swatch the new iScream polishes I got from my friend Junlynn as an early birtbirthday present but I just had to try it!

This is iScream nails Blue Heaven on OPI Alpine Snow. It came out better than I realised! 

Also, not sure if you guys actually noticed that the composition of my photo is different now but I'm trying out something new. Here's the story, I was out yum cha-ing (literally translated as drinking tea) or having supper with my friend at Alexis Telawi and this guy selling lights comes up to our table. The table light he was selling was foldable and extremely bright! I was sold! 

Thus how I ended up using the light to take photos of manis at night instead of in the morning. I seldom take morning photoa because I wake up early for work and I'm indoors during the morning. I'm still working out the angle and stuff but so far so good. 

Another surprise! The blue mani got more than 100 likes on Instagram! This is a first for me! For those on instagram reading this, thanks a bunch! 

In the meantime, here's a really short picture tutorial for you guys. 


First, paint a layer of white - I used OPI Alpine Snow. Top it off with your favourite top coat - I used Glisten & Glow HK Girl. Then used some striping tape or nail vinyl and place it in the middle - I used @teismom nail vinyls. Once placed properly, paint your chosen colour until opaque and carefully remove the tape before the polish dries - I used Laval Pink & iScream Nails Blue Heaven. Finally, top it off with top coat and you're done! 

Simple rite! 

That's it for this post!
Cheers!

Tuesday, December 2, 2014

May You Have A Bubble Christmas!

Hey guys!

So I just finished Day 2 of Blogilates #Decemburn Calender! I have a love hate relationship with cardio...

Anyway! I decided to do something with my current mani but I shall leave it till tomorrow to show you guys that mani!

First, let me share my current mani. I tried out Nailasaurus's youtube tutorial on the nimbus bubbles technique. I definitely need more practice but practice makes perfect as they say.


Colours used:

White - OPI Alpine Snow
Red - OPI Big Apple Red
Green - Sally Hansen Emerald City

Look forward to the surprise tomorrow! 
Cheers!

Friday, May 17, 2013

3D Dots

Hello all!

Wonder when the last time blogged was? I thought I would mix it up a bit and put everything on the left! XD 

Anywayz, I saw this cool mani on @slacquerr on instagram and tried it out for myself! 

She called them 3D Dots so I shall just go with it! XD 

It looks nice yeah? Feel like experimenting with it a little.

Hopefully it turns out well! ^^


If any of you want to paint this, it's really simple!

1. Paint a base colour of your choice.

2. Use your dotting tool to make blacks dots.

3. Use the same size dotting tool to dot white onto the black dots at an angle, leaving a little of the black dot visible. (This creates a 3D effect)

4. Finally, top it off with a top coat of your choosing! (I like Seche Vite FYI) 


And that's how you do it! 

Hope you guys will have fun with this mani as I did! 

Cheers! 
^^


P/S: I really like how this post came out...I might stick to this format! XD 

Wednesday, June 27, 2012

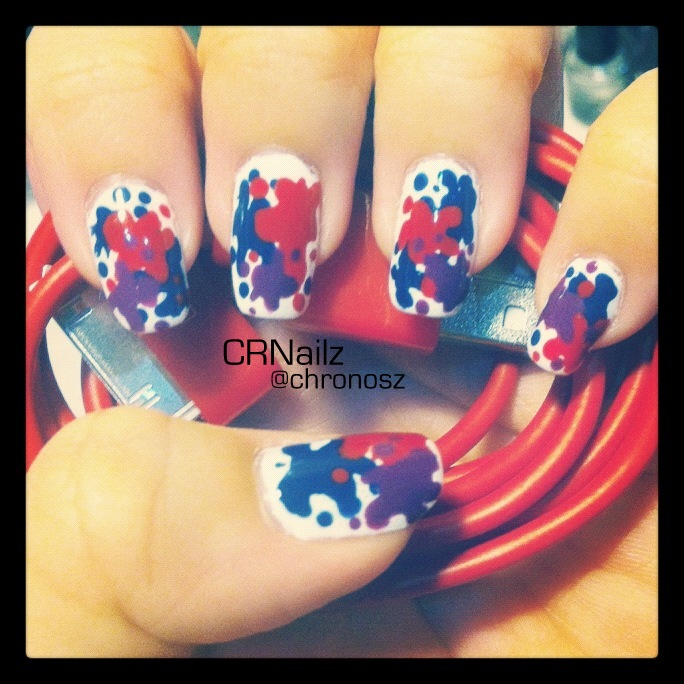
Paint splatter mani!!

*SPLAT*
Elo elo!!
I've always wanted to do a paint splatter mani but it looked so messy so I didn't try it...yet!
This girl on instagram had her own image of paint splatter mani!
It was so cute I had to try it! XD

Her username on instagram is 
@ohtammm
She's got some pretty cool designs and tutorials!
Check her out! 
^^


This is really cool and fun mani to do! XD

Oooohhhh!!! My colourful iphone cords came that day!!
They were such good props to take photos with the mani!!
^^

Nice colour combo eh! XP


Here's a short tutorial for you guys!
The original can be found on @ohtamm's instagram! =)


1. Paint your base with white polish. I used OPI Alpine Snow (my fav). 
Don't forget the base coat!! 
2. Then use your dotting tool and put a medium sized dot on wherever on your nail and start dragging it to form a splatter shape. 
3. Repeat this on all nails till you're satisfied with the design.


GAHAHAHAHAHA!!! Weird tutorial!!
Oh well!! 
Cheers!!
^^