Happy Mid-Autumn Festival!
Or in my case, Happy Lantern/Mooncake Festival! =)
In conjunction with the event, here's a lantern mani using Moyou London's Zodiac plate!!!
I actually wanted stamp with a green polish over Miss Ashleigh's Midnight Shadows but it didn't really work out so I went the other way.
I painted 3 layers of green OPI tint and stamped using Mundodeunas black. The design came out quite nice!
That's it for this post!
Cheers!
P/S: Eat more mooncakes!
Showing posts with label green. Show all posts
Monday, September 28, 2015
Happy Mid-Autumn Festival!
Labels:
black,
event,
festival,
green,
grey,
mid autumn festival,
miss ashleigh,
mooncake,
moyou london,
Mundodeunas,
nail art,
nail polish,
nails,
opi,
stamping,
tint,
zodiac
Friday, July 10, 2015
How About A Grasshopper Pie?
Hey guys!
Following up on my iScream nails stash, here's the first swatch with Grasshopper Pie!
Actually, before I knew the name of the polish I thought it was going to be mint something. It was quite a surprise when it turned out to be grasshopper pie! Now every time I see the polish, I'll be thinking of grasshoppers! LOL Not that it's a bad thing. LOL
Anyway, here's the swatch!
Grasshopper pie is mint green which is a bit pastel and a bit neon at the same time which would qualify it as a pastel neon. Duh! In my opinion, 5 out of 6 of the polishes are pastel neons. The swatch is 3 layers over a layer of OPI Alpine Snow a.k.a. my favourite white polish! I don't find it streaky but it does leave blotches thus why I needed 3 layers. Also, I tend to paint pastels over a layer of white polish now to give it an extra UMPH! and brightness.
Personally, Grasshopper Pie is one of my favourites among the polishes. I love minty colours and mint colours that actually stand out above the rest are totally worth it.
On the other hand (literally), here's the nail art I did with it as a base. I noticed a surplus of chevron on the instagram lately and decided to join it. Darn me for doing it free hand...I actually wanted to use @teismom chevron vinyls but the vinyls are the wide chevron type I wanted to paint the thinner and longer chevron so free hand it was. Such regret, much sad. It turned out alright on the pointer finger but the rest were terrible. The lines were so thick and rough and bumpy. *cries* On the bright side, I have to say it's pretty good considering that I was painting my princess hand. :P
That's it for this post!
Cheers!
Following up on my iScream nails stash, here's the first swatch with Grasshopper Pie!
Actually, before I knew the name of the polish I thought it was going to be mint something. It was quite a surprise when it turned out to be grasshopper pie! Now every time I see the polish, I'll be thinking of grasshoppers! LOL Not that it's a bad thing. LOL
Anyway, here's the swatch!
Grasshopper pie is mint green which is a bit pastel and a bit neon at the same time which would qualify it as a pastel neon. Duh! In my opinion, 5 out of 6 of the polishes are pastel neons. The swatch is 3 layers over a layer of OPI Alpine Snow a.k.a. my favourite white polish! I don't find it streaky but it does leave blotches thus why I needed 3 layers. Also, I tend to paint pastels over a layer of white polish now to give it an extra UMPH! and brightness.
Personally, Grasshopper Pie is one of my favourites among the polishes. I love minty colours and mint colours that actually stand out above the rest are totally worth it.
On the other hand (
That's it for this post!
Cheers!
Monday, July 6, 2015
An Early iScream Birthday!
Hey guys!
Soooo someone really sweet has given me my birthday present SIX months in ADVANCE! Can you guys guess what it is? I think you cannnnnn!!!
Woo hoo! Six iScream nails polishes! This sweet girl came back from Melbourne with a extremely sugary surprise! I actually almost bought the polishes until she told me not to!
From the left: Bubblegum Bang, Mint Madness, Grape Soda
From the left: Blue Heaven, Grasshopper Pie, Juicy Juicy
I'm not the type to swatch polishes in one day because if it's pretty then I don't want to waste it. I have a plan now to swatch and do some nail art before moving to the next colour. If you follow my instagram @chronosz or read the previous post then you would have seen this mani.
This was done using iScream nails Blue Heaven.
So look forward to the swatches. :)
That's it for this post!
Cheers!
Soooo someone really sweet has given me my birthday present SIX months in ADVANCE! Can you guys guess what it is? I think you cannnnnn!!!
Woo hoo! Six iScream nails polishes! This sweet girl came back from Melbourne with a extremely sugary surprise! I actually almost bought the polishes until she told me not to!
From the left: Bubblegum Bang, Mint Madness, Grape Soda
From the left: Blue Heaven, Grasshopper Pie, Juicy Juicy
I'm not the type to swatch polishes in one day because if it's pretty then I don't want to waste it. I have a plan now to swatch and do some nail art before moving to the next colour. If you follow my instagram @chronosz or read the previous post then you would have seen this mani.
This was done using iScream nails Blue Heaven.
So look forward to the swatches. :)
That's it for this post!
Cheers!
Labels:
australia,
birthday,
blue,
friend,
green,
indie,
iScream nails,
mint,
nail art,
nail laquer,
nail polish,
neon,
pastel,
pink,
purple,
swatch,
sydney,
yellow
Tuesday, June 2, 2015
A Happy Belated Birthday!
Hi everyone!
I was planning to post this a little earlier but the photos took some time.
I would like to wish my grandfather a belated 83rd birthday and may we all celebrate more birthdays to come!
My mani that night was inspired by an NCLA wrap classic. I wanted something simple, quick and elegant. So, I picked my current favourite colour which is Canmake Mint and started at it.
Here's the original NCLA wrap where the inspiration came from. I love NCLA wraps, especially the ones that were made from actual real life views. I have yet to try one but mark my words, I will one day.
That's it for this post! Here are some photos from that night to end the post. =)
Cheers!
I was planning to post this a little earlier but the photos took some time.
I would like to wish my grandfather a belated 83rd birthday and may we all celebrate more birthdays to come!
My mani that night was inspired by an NCLA wrap classic. I wanted something simple, quick and elegant. So, I picked my current favourite colour which is Canmake Mint and started at it.
All photos except the above is taken by le boyfriend a.k.a. Zephyrus Photography
Here's the original NCLA wrap where the inspiration came from. I love NCLA wraps, especially the ones that were made from actual real life views. I have yet to try one but mark my words, I will one day.
Photo source: NCLA
That's it for this post! Here are some photos from that night to end the post. =)
Cheers!
It was so hard to get the cake out of the box when all the kiddies think it's their cake.
Had a very spontaneous nail painting session with le cousins gf! The more practice the better!
Labels:
birthday,
canmake,
event,
favourite,
food,
grandfather,
green,
inspired,
japan,
mint,
nail laquer,
nail polish,
nails,
ncla,
wraps
Monday, April 20, 2015
Bon Bon 37 & 38 Review
Hey guys!
This is wayyyyy overdue but better late than never rite?! These two polishes are from my Japan Nail Polish Haul from a month back and they are Bon Bon polishes!! No...the bottles are not the shape of bon bons sadly...anyways! Here are the swatches.
Bon Bon 38 is a bright yellow pastel and I will never use it again! Why? It stains...really really REALLY bad! I would have to stay that it's in the same league with Sinful Colors Pistache... Mind you that I was wearing a clear gel base under the yellow and the difference of colour of my right and left hanf nails once removed was very apparent!
My verdict for the polishes...2/5...they wasn't much choice where I went and worse yet that it stained my naila so badly...
That's it for this post! I hope it didn't disappoint you guys much...
Cheers!
This is wayyyyy overdue but better late than never rite?! These two polishes are from my Japan Nail Polish Haul from a month back and they are Bon Bon polishes!! No...the bottles are not the shape of bon bons sadly...anyways! Here are the swatches.
From left: Bon Bon 38 & 37
Bon Bon 37 is a kiwi green pastel colour that is opaque in three to four coats. I quite like the colour when opaque and in hindsight, it might have been a better idea to paint it over a coat of white. As for application (applies for Bon Bon 38 also), it was extremely streaky...I had to get a gigantic dollop of polish to cover the nail evenly. Thank goodness it turned out nice and thin.
My verdict for the polishes...2/5...they wasn't much choice where I went and worse yet that it stained my naila so badly...
That's it for this post! I hope it didn't disappoint you guys much...
Cheers!
Labels:
bon bon,
green,
japan,
nail laquer,
nail polish,
nail swatch,
review,
swatches,
yellow,
ネイルから,
日本
Friday, April 10, 2015
Stamping Wonders
Hey guys!
I thought I would share some of my latest manis with you just in case you don't follow me on my instagram @chronosz. =)
I did this mani with no particular design in mind...I just wanted my current fav Canmake polish and some sort of design. So, I flipped through my stamping plates for a nice design and decided on one from BM-404. I used reverse stamping to get the pattern on.
Polishes used :
Base coat - Essence Ultra Strong Nail Hardener
Green - Canmake 406C
Gold Glitter - OPI Don't Speak 18k Gold Top Coat
Stamping Polish - Laval Black
Top Coat - Glisten & Glow HK Girl
This is my current NOTD but not for long!! I'm going for something girly next!
As you can tell, I've been doing some stamping here and there. This mani is a double stamped butterfly design also using a Bundle Monster plate.
Colours Used :
Base Coat - Essie Nail Hardener Top Coat
Blue Texture Polish - Miss Ashleigh See You In Santorini
White stamping polish - Mundodeunas white
Purple polish - Color Club Ms. Socialite
Top Coat - Glisten & Glow HK Girl
Bundle Moster Stamping Plate BM-307
I wasn't really feeling this mani...but others did so that's good enough for me! Look forward to more swatches!
That's it for this post!
Cheers!
I thought I would share some of my latest manis with you just in case you don't follow me on my instagram @chronosz. =)
I did this mani with no particular design in mind...I just wanted my current fav Canmake polish and some sort of design. So, I flipped through my stamping plates for a nice design and decided on one from BM-404. I used reverse stamping to get the pattern on.
Polishes used :
Base coat - Essence Ultra Strong Nail Hardener
Green - Canmake 406C
Gold Glitter - OPI Don't Speak 18k Gold Top Coat
Stamping Polish - Laval Black
Top Coat - Glisten & Glow HK Girl
This is my current NOTD but not for long!! I'm going for something girly next!
As you can tell, I've been doing some stamping here and there. This mani is a double stamped butterfly design also using a Bundle Monster plate.
Colours Used :
Base Coat - Essie Nail Hardener Top Coat
Blue Texture Polish - Miss Ashleigh See You In Santorini
White stamping polish - Mundodeunas white
Purple polish - Color Club Ms. Socialite
Top Coat - Glisten & Glow HK Girl
Bundle Moster Stamping Plate BM-307
I wasn't really feeling this mani...but others did so that's good enough for me! Look forward to more swatches!
That's it for this post!
Cheers!
Labels:
blue,
bundle monster,
butterfly,
canmake,
gold,
green,
japan,
nail art,
nail laquer,
nail of the day,
nail polish,
notd,
opi,
purple,
raya,
reverse stamping,
stamping,
texture polish,
white
Saturday, March 28, 2015
Have An Easter Togepi!
Hi all!
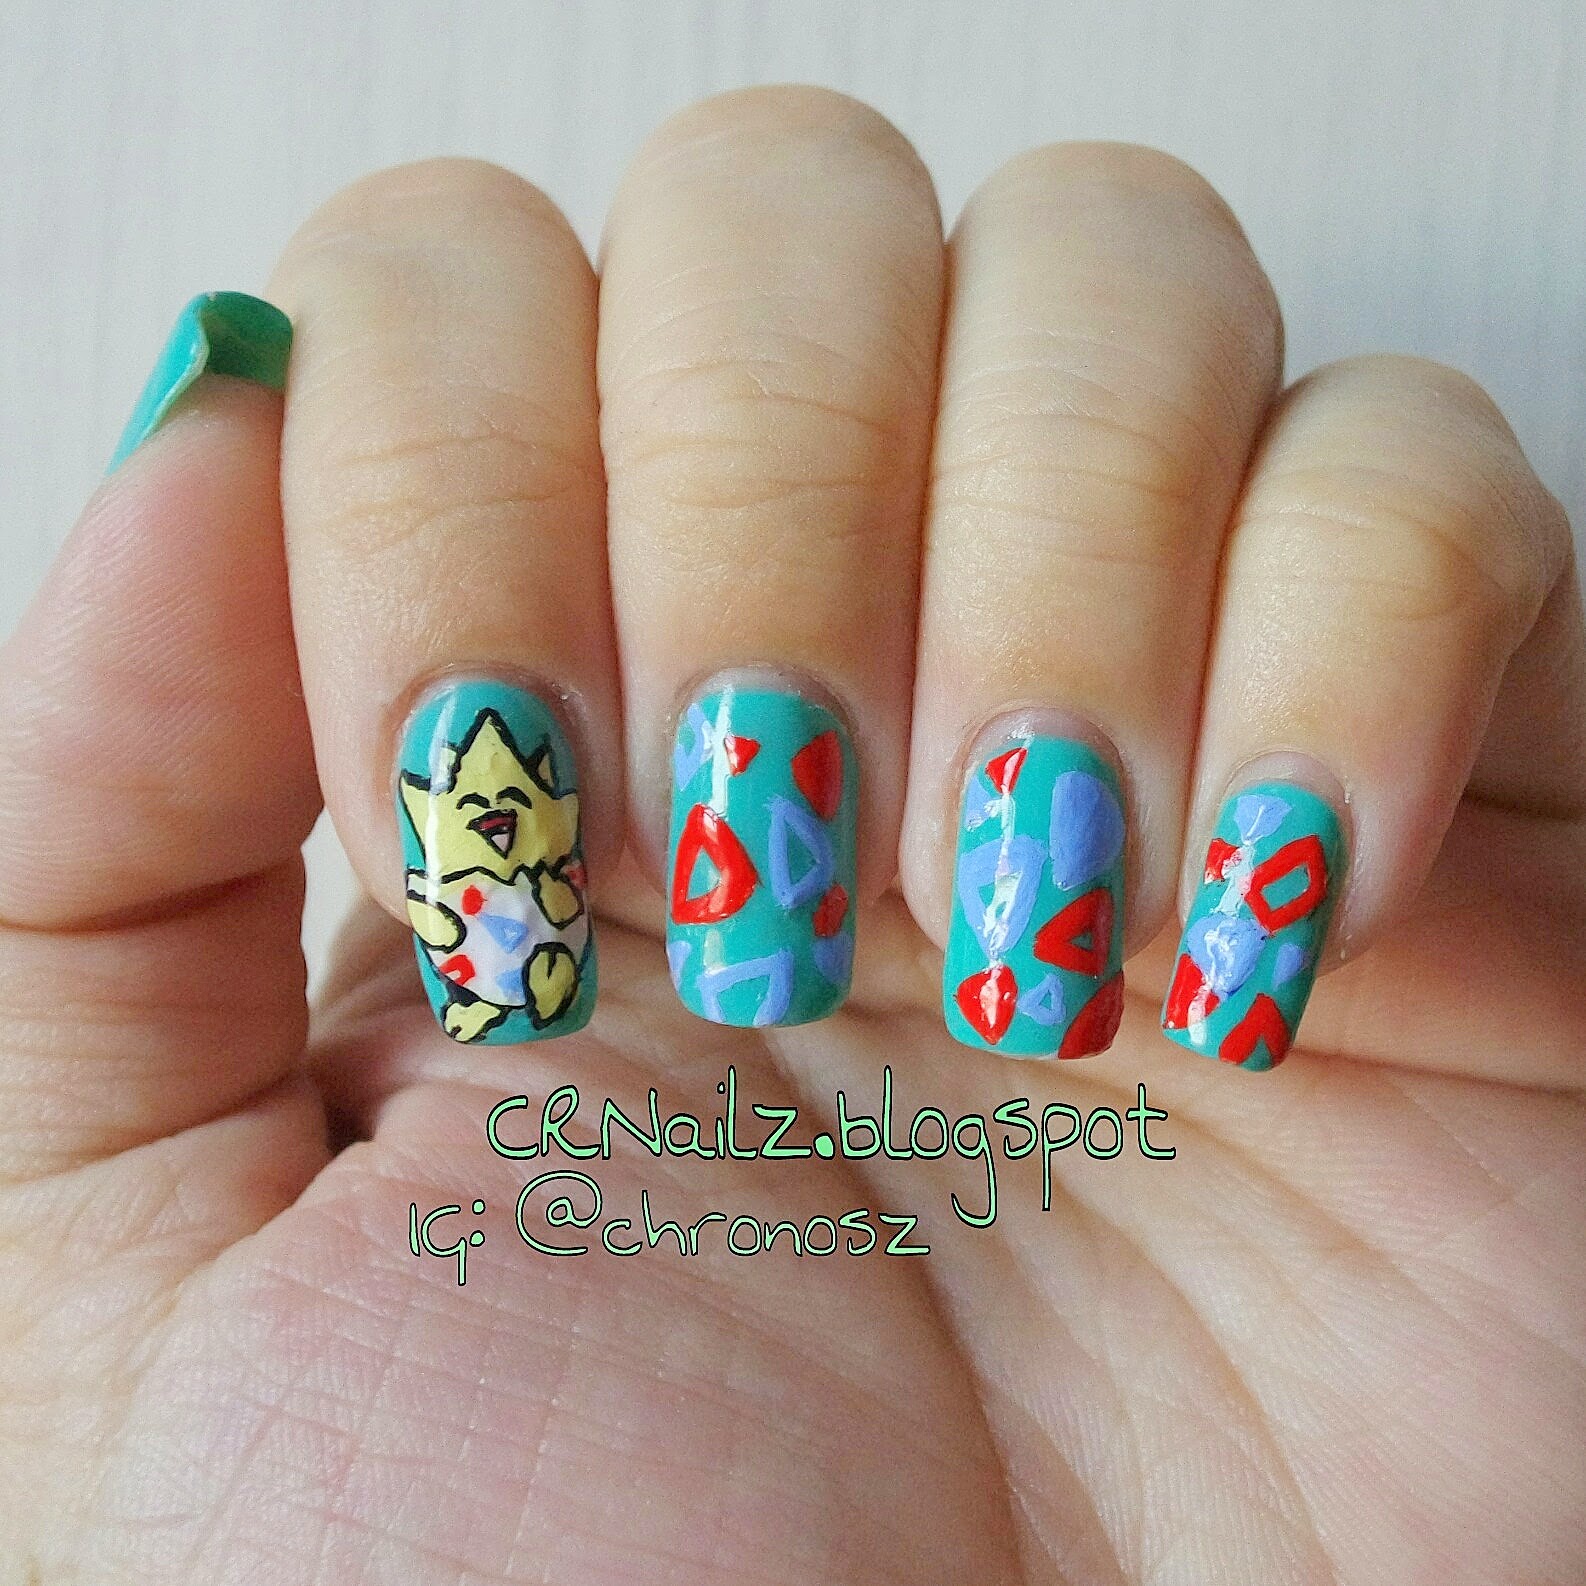
Happy Early Easter! I actually had the urge to paint pokemon since I haven't attempted it before and since Easter is coming...how about a cute egg pokemon?! 😆
Please welcome to the blog - Easter Togepi!
I'm actually quite impressed with the overall result considering that I haven't painted free hand for a while.
Colours Used :
Base | Gelist Clear Gel Base, Pa
White | OPI
Other colours | Acrylic Paint
I shall attempt to paint other pokemons soon!
That's it for this post!
Cheers!
Happy Early Easter! I actually had the urge to paint pokemon since I haven't attempted it before and since Easter is coming...how about a cute egg pokemon?! 😆
Please welcome to the blog - Easter Togepi!
I'm actually quite impressed with the overall result considering that I haven't painted free hand for a while.
Colours Used :
Base | Gelist Clear Gel Base, Pa
White | OPI
Other colours | Acrylic Paint
I shall attempt to paint other pokemons soon!
That's it for this post!
Cheers!
Labels:
acrylic paint,
black,
blue,
easter,
gel,
gelist,
green,
japanese,
nail laquer,
nail of,
nail of the day,
nail polish,
nails,
notd,
pa,
pokemon,
red,
togepi,
white,
yellow
Wednesday, March 18, 2015
Happy St Patty's Day!
Hi guys!
I'm finally back from Japan and coincidentally I'm just in time for St Patty's Day!
I couldn't wait to start using my new polishes I got from Japan! These are the colours I used:
Yellow - Bon Bon
Green - Bon Bon
Clover - Sally Hansen
Glitter - Pa
Top Coat - Glisten & Glow HK Girl
Base Coat - Essie Nail Hardener
Gel Base - Gelist Clear Base
Yes...I started using gel! I'm quite happy with the gel since it makes my nail hard and strong. I'm still looking for a new brand of nail polish remover and a place that sells 100% pure acetone...
Look forward to my nail haul from Japan! I'm so excited and you should be too!
That's it for this post!
Cheers!
I'm finally back from Japan and coincidentally I'm just in time for St Patty's Day!
I couldn't wait to start using my new polishes I got from Japan! These are the colours I used:
Yellow - Bon Bon
Green - Bon Bon
Clover - Sally Hansen
Glitter - Pa
Top Coat - Glisten & Glow HK Girl
Base Coat - Essie Nail Hardener
Gel Base - Gelist Clear Base
Yes...I started using gel! I'm quite happy with the gel since it makes my nail hard and strong. I'm still looking for a new brand of nail polish remover and a place that sells 100% pure acetone...
Look forward to my nail haul from Japan! I'm so excited and you should be too!
That's it for this post!
Cheers!
Labels:
base coat,
bon bon,
essie,
four leaf clover,
gel,
gelist,
glitter,
green,
hk girl,
japan,
japanese,
nail art,
nail laquer,
nail polish,
pa,
sally hansen,
shimmer,
st Patrick's day,
top coat,
yellow
Wednesday, January 21, 2015
Love Birds
Hey peeps!
So I just posted a NOTD on instagram and thought "I better write this blog post before I get lazy!"
Yup! That's me...anyway...I haven't painted birds before me thinks...I wanted to do an owl mani that day but all the googled owls didn't appeal to me...Darn me for not screen shoting the nice owl mani!
Back to the point, I saw this wedding invitation on FB that my friend posted (was not his wedding) and thought "Well, that's cute! I should paint that!" So, I did with a little change in scenery of course hahaha
Here's the original.
And here's the mani!
Colours used:
Base coat - Essence Ultra Strong Nail Hardener
Base - Miss Ashleigh Experi-mint & Baby's Got The Blues Ombre (I did this ombre using a brush technique I saw @yagala do on insta...check her out! I think this technique blends better than sponge!)
Others - Acrylic Paint
Top Coat - Glisten & Glow HK Girl
Base coat - Essence Ultra Strong Nail Hardener
Base - Miss Ashleigh Experi-mint & Baby's Got The Blues Ombre (I did this ombre using a brush technique I saw @yagala do on insta...check her out! I think this technique blends better than sponge!)
Others - Acrylic Paint
Top Coat - Glisten & Glow HK Girl
That's it for this post!
Cheers!
Labels:
acrylic,
black,
blue,
brown,
essence,
glisten and glow,
green,
heart,
hk girl,
love birds,
miss ashleigh,
nail art,
nail laquer,
nail of the day,
nail polish,
nails,
notd,
paint,
tree
Wednesday, December 10, 2014
Normal Stamping Vs Reverse Stamping
Hey guys!
I posted this mani on instagram (@chronosz) last night and wanted to discuss the pros and cons of 'Normal stamping Vs Reverse Stamping'.
The photos are not very clear but hopefully it will suffice for this brief explanation.
I used reverse stamping on the pointer finger whereas the others were done using the normal stamping method. From my observation, the design is clearer and neater using the reverse stamping method. On the other hand, the normal stamping allows for missing pieces of the pattern and the design can sometimes come out crooked.
This can be explain by the following:
I posted this mani on instagram (@chronosz) last night and wanted to discuss the pros and cons of 'Normal stamping Vs Reverse Stamping'.
The photos are not very clear but hopefully it will suffice for this brief explanation.
I used reverse stamping on the pointer finger whereas the others were done using the normal stamping method. From my observation, the design is clearer and neater using the reverse stamping method. On the other hand, the normal stamping allows for missing pieces of the pattern and the design can sometimes come out crooked.
This can be explain by the following:
- You did not stamp the design properly
- Part of the polish dried
- The polish you are using is not suitable
For me, I am still looking for a good stamping polish. my favourite black polish from The Faceshop is too sheer for stamping. So far, I have purchased black polishes from Laval and Rica. Truth be told, I was incredibly excited when I got my Rica polishes. I had seen so many beautiful manis using her polish but to my dismay it was not meant to be. The Rica polish was impossible to stamp with, even with the reverse stamping method. I'm not saying that it's not good but there were other factors preventing me from using it properly. I'll comment more on this in a different post.
Getting back to the topic at hand, reverse stamping is done by top coating the design when it is on the stamper, wait for it to dry, peel it off, top coat your nail and paste it on like a nail wrap. Basically, it's a DIY nail wrap. The reason why the design comes out neater is because reasons 1 & 2 do not apply here. The downside is that it could come out uneven when you're putting it on your nail. I still have difficulties with it and most of the time, the side of the 'nail wrap' doesn't stick on the nail and it leaves air pockets.
It is best to press it down onto your nail and make sure it's stuck on hard first before cutting off the excess and applying another layer of top coat. Here's a video tutorial from the amazing Sveta Sanders. Check here instagram out for more amazing manis!!
In my opinion, normal stamping is all good if you've got a good polish while reverse stamping is good when you have some of the problems above like I do or if you want to add a little colour to the design.
That's all for this post!
Cheers!
Labels:
black,
ciate,
comparison,
green,
indie,
instagram,
konad,
laval,
nail,
nail art,
nail laquer,
nail polish,
reverse stamping,
rica,
stamping,
sveta sanders,
swatch
Wednesday, December 3, 2014
Bubble Trees
Hey all!
Here's the continuation of yesterday's mani!
I call them bubble trees!! The best part is that I have a picture tutorial for you guys so you can paint them yourself! This is probably my first time making a tutorial so bear with the bad photos and instructions! Here we go!
Here's the continuation of yesterday's mani!
I call them bubble trees!! The best part is that I have a picture tutorial for you guys so you can paint them yourself! This is probably my first time making a tutorial so bear with the bad photos and instructions! Here we go!
- Use Christmas colours (or any colour you like) using the Nimbus Bubbles technique (tutorial on The Nailasauraus)
- Overlap lightning nail vinyls (i'm using ones from Teismom) with the lightning facing out until it forms a tree shape
- Cut off the excess at the top until it is pointed
- Paint over the sides of the vinyls, making sure that you do not get any polish on the middle and the bottom of the nail as there will be exposed areas
- Remove the vinyls and apply your favourite top coat (I'm using Glisten & Glow HK Girl)
That's it! I hope you enjoyed the tutorial and I will see you soon!
P/S: Don't forget to tag me @chronosz on instagram if you used the tutorial!
Cheers!
Tuesday, December 2, 2014
May You Have A Bubble Christmas!
Hey guys!
So I just finished Day 2 of Blogilates #Decemburn Calender! I have a love hate relationship with cardio...
Anyway! I decided to do something with my current mani but I shall leave it till tomorrow to show you guys that mani!
First, let me share my current mani. I tried out Nailasaurus's youtube tutorial on the nimbus bubbles technique. I definitely need more practice but practice makes perfect as they say.
Colours used:
White - OPI Alpine Snow
Red - OPI Big Apple Red
Green - Sally Hansen Emerald City
Look forward to the surprise tomorrow!
Cheers!
Wednesday, May 21, 2014
Stamping Fever!
Elo Elo!
I've been super into konad recently and my current fav is Bundle Monster's 'Create Your Own' Collection 2013 (CYO 2013).
photo credit to www.bundlemonster.com
Yeah! So those are the plates included in the collection. Who says that freestyle is the only way to go!
I used to be so against using konad since the first time I used it and it turned out to fugly! ><
But after getting slightly better I wanna find more ways to create manis with them!
Here are some of the mani I did with the CYO 2013.
Really like the binary code mani! I really want proper konad polishes now tho. The normal nail polish doesn't stick as much and sometimes ends up super light.
Definitely going to try out more designs and never forgetting to do some freestyle! Venturing out into another style of nail art soon!
That's it for now!
Cheers! ^^
Saturday, October 5, 2013
#HalloweenChallenge2013 Day 5 - Zombie
Hello all!
More challenge manis!
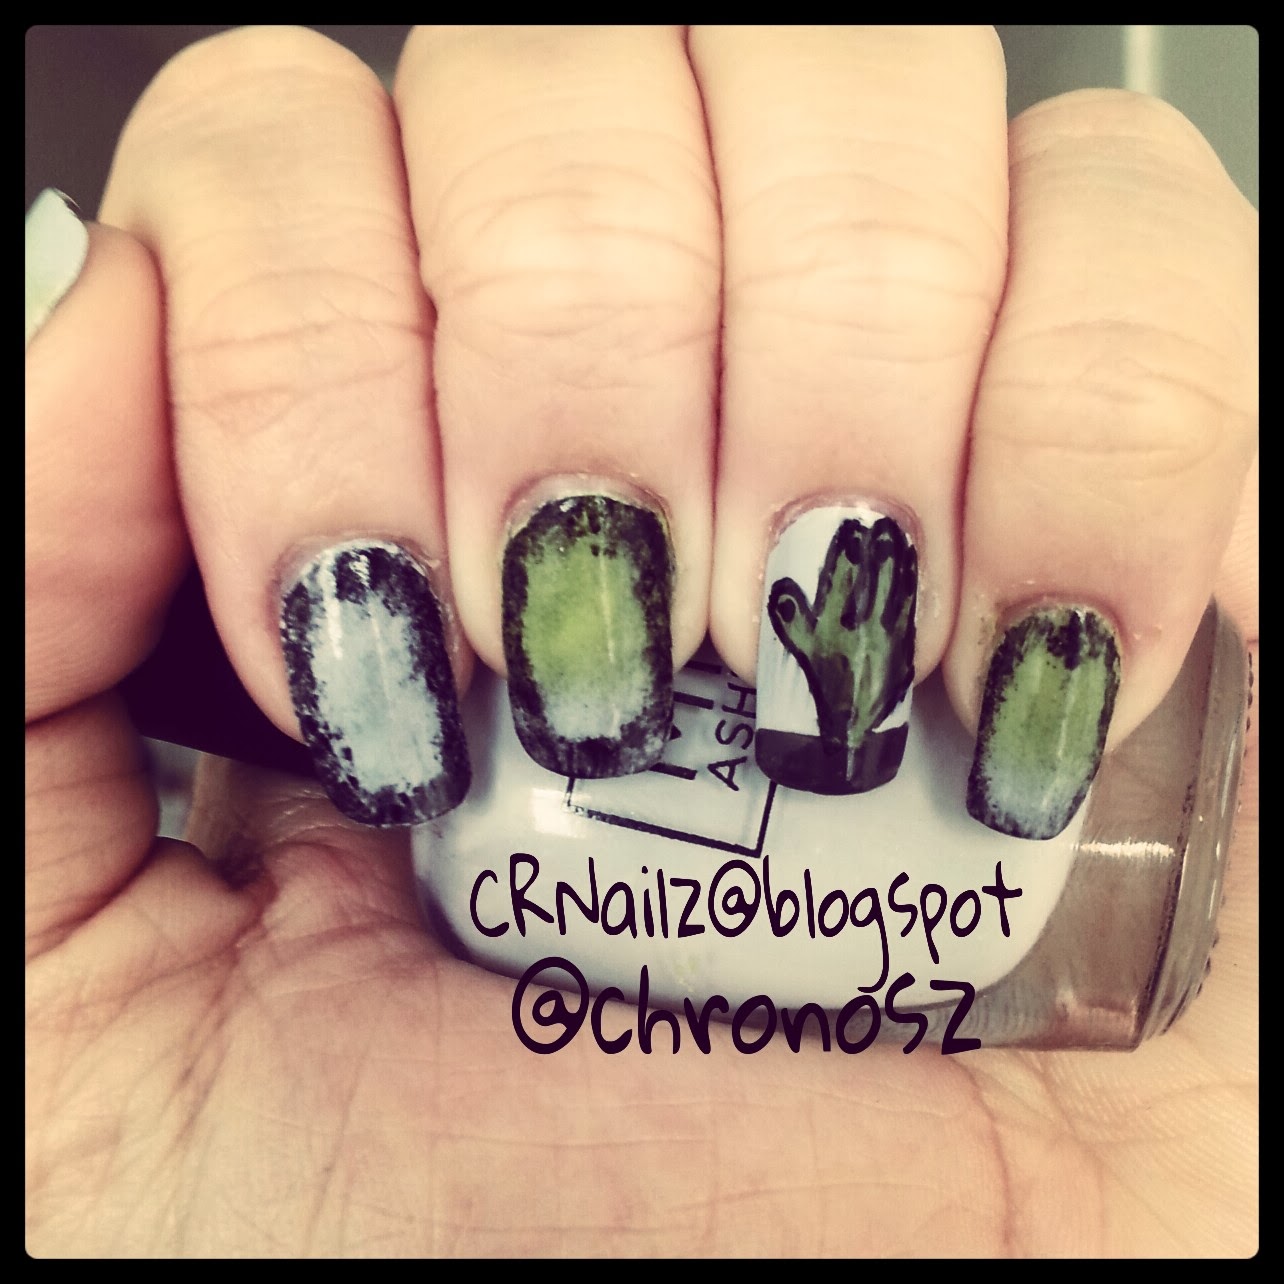
So October 5th's theme is zombie...
gwahhhhhhhhhhhh
(did you just think the gwahhhhhh in a zombie voice?)
=P
As you can see, I am terrible at drawing zombies...thus only the hand it visible! XD
I was going for a gory look for the framed nails...I think it looks good =)
This is the pic with the instagram filter.
I think it looks more gory! Which is awesome! XD
That's it for this post!
The next theme is witches which I am quite excited about!
I've got some designs prepared and might be using some konad stamps as well
Till next time!
Cheers!
^^
Sunday, September 22, 2013
Konad, konad, & more konad!
Phew!
This is my third post in a row for the night!
Not really a big achievement but I'm supposed to be in bed right now ><
Anywayz...so I got to more stamping with my konad plates.
Quite happy with the turnout!
Looks pretty good yeah!
The plates I used from the left:
m79 m73 m78 m60
Kinda order Bundle Monster plates a while ago.
My hand just moved on their own and clicked the order button on the website! ><
Can't wait for them to arrive!
I've always seen BM designs all over and they are amazing but it isn't just the design that makes the mani amazing but the person who painted it. The nail artist is the person that controls the design.
That's it for this post!
More to come for sure!
Cheers!
^^
Labels:
australis,
black,
bundle monster,
essie,
faceshop,
gradient,
green,
konad,
mint,
music,
nail laquer,
nail polish,
ombre,
opi,
polkadot,
purple,
violet,
white
Miss Ashleigh Thermal Polish Kryptonite Swatch
I've got a good one for you guys!
Yup! This awesome thermal polish chocked full of glitter!
Well! I got another one from her recently!
Kryptonite!
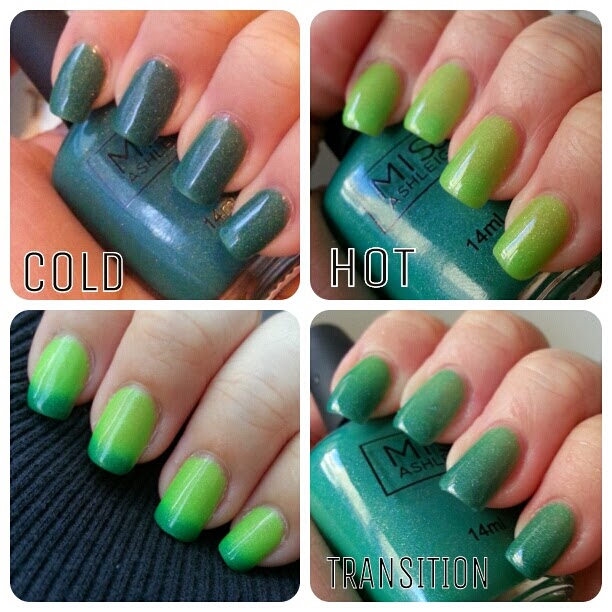
From the name, one can already tell that the polish is green in colour.
Like all Miss Ashleigh polishes, you get a beautiful opaque shade with 2 layers.
It doesn't chip as fast as other nail polish and it's healthier than other store bought polishes.
Enough talk! Here comes the photos!
Kryptonite is a green based polish with a slight shimmer. It is dark green when cold and bright green when hot. As usual, my body temperature is so hot that I usually get a nice french looking mani as can be seen on the bottom left of the collage above. French mani in bottle! Cool rite! XD
I was also playing around with studs since I haven't used them much and this is what came out of it!
Seriously amazing how I can have so many different types of manis with one polish!
I absolutely love it! I could stare at my nails all day and I did!
Check out her polishes at
Cheers for now!
^^
Sunday, September 1, 2013
September...A Month of Challenges...Day 1
Hello all!
It is the 1st of September,
I am currently on Spring break,
Today is my mother's birthday,
and it is the first day of @californails #nailartsept challenge!
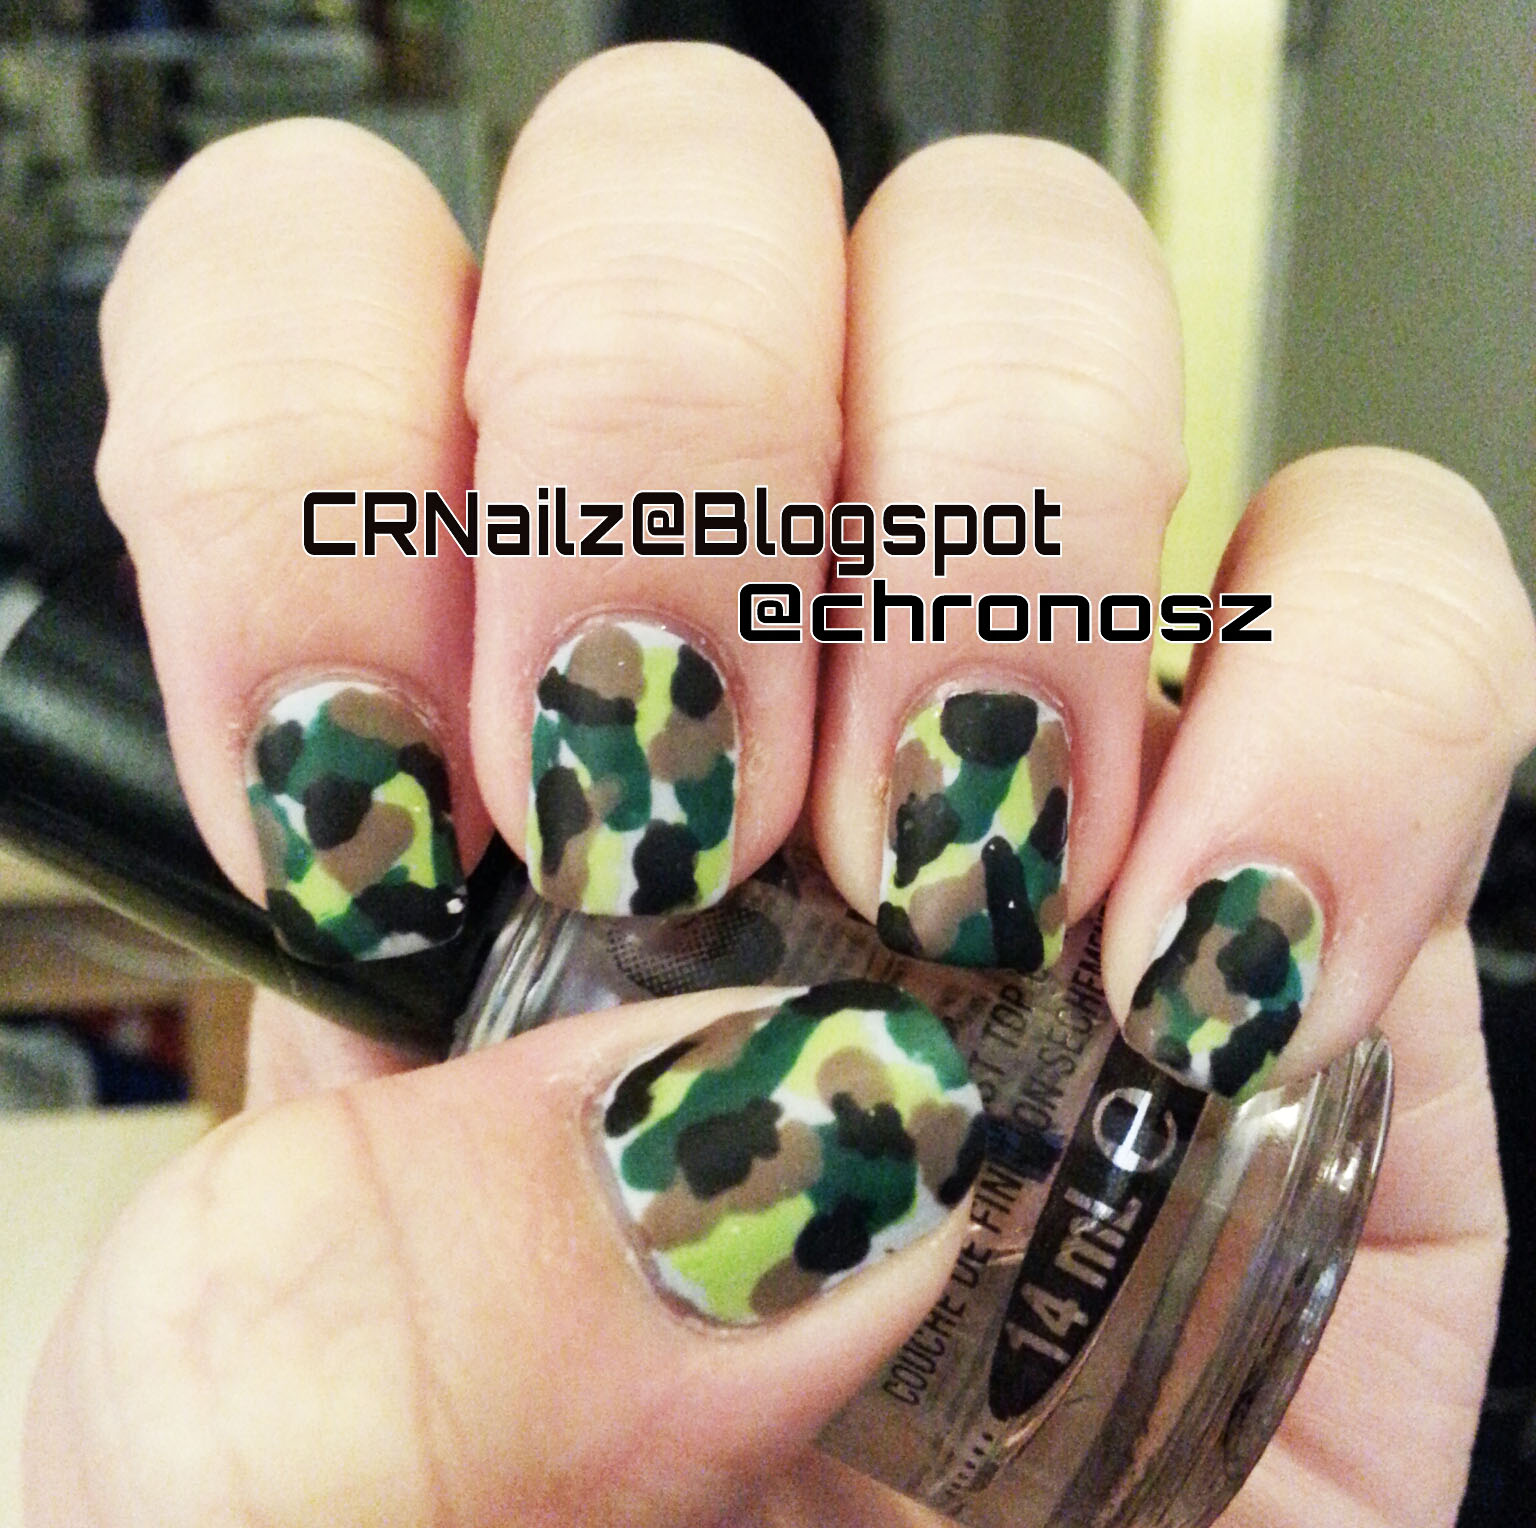
The first deems it is time for camo nails!
Camo is short for camouflage...if you didn't already know! XD
This is actually my first time attempting camo nails.
I don't think it's the best but looks good to me!
Look forward to more designs yeah!
I've got a really great swatch for you guys which I will upload tonight.
That's it for this post.
Cheers,
-Jing-
Labels:
black,
brown,
californails,
camo,
camouflage,
challenge,
essie,
faceshop,
green,
grey,
instagram,
matte,
missashleigh,
nail art,
nailartsept,
olive,
opi,
sally hansen,
september
Subscribe to:
Posts (Atom)